|
|
||
|---|---|---|
| debian/galmon-0.20220307-1 | ||
| pics | ||
| .gitignore | ||
| LICENSE-CC | ||
| README.md | ||
README.md
Spacecruft Galmon
Notes on setting up galmon.eu ground stations.
Galmon
Galmon is a system to monitor GNSS.
Ground stations on Earth use galmon software to collect data
from each GNSS satellite.
Main website:
Source code:
GNSS:
Ground Stations
There are two main GNSS chipsets that the galmon software support.
UBX and Septentrio.
The former is more widely used and easier to set up.
U-Blox
Using these devices are as easy as installing galmon software and
running the startup script. No device configuration is needed.
There are a variety of UBX devices, the ones below use the
U-blox ZED-F9 chipset.
U-Blox website:
Ardusimple website:
simpleRTK2B USB. Available at Mouser.
simpleRTK2B-mPCIe. Available at Mouser.
Start devices with options, ala:
cat /etc/default/ubxtool-ttyACM0

DAEMON_OPTS="--owner 'Jeff Moe SpaceCruft' --remark 'Colorado, USA | Traverse Ten64 | simpleRTK2B-mPCIe' --gps --galileo --beidou --glonass --station XXX --destination XXX.submit.galmon.eu"
Septentrio
The Septentrio device is available as apparently very high quality standalone (unobtanium?) hardware that can plug directly into ethernet, amongst other configurations. Septentrio also resells their chips to third party integrators that make their own more readily available boards, such as the one used in the following setup.
Septentrio website:
Ardusimple simpleRTK3B with Septentrio mosaic-X5.
Note: in Ardusimple's lineup, the devices with "2" in them, such as simpleRTK2B are UBX, while devices with "3", such as simpleRTK3B are Septentrio.
Manufacturer's part number:
- AS-RTK3B-MX5-L125-NH-00
Not sold by Sparkfun, adafruit, or Digikey. Mouser part number:
- 780-ASRTK3BMX5L125NH
HOWTO set up the Septentrio simpleRTK3B USB. This was done using a Traverse Ten64 arm64 with Debian Bullseye (stable/11) as the server. Should be similar for Raspberry Pi or other Debian systems.
Plug in the antenna to the simpleRTK3B. Plug the USB-C into the USB port on the server. Use the USB-C port labeled "GPS", which is the one on the same end as the antenna. This port will supply power to the device. When connected, it creates the following on the server via USB:
/dev/ttyACM0--- Serial port,8N1at115200baud./dev/ttyACM1--- Serial port,8N1at115200baud./dev/sr0--- Emulated CDROM, also accesible via symlink/dev/cdrom./dev/sda--- Hard drive.usb0--- USB network interface.
The CDROM drive just contains proprietary drivers.
The hard drive is not readable from Debian, at least not initially.
By default, the simpleRTK3B device won't send any data.
So /dev/ttyACM0 and /dev/ttyACM1 are available, but not
streaming any GNSS data.
To configure the simpleRTK3B device, the USB network interface needs to be set up, then the device can be configured via its web interface.
For testing, set up a temporary network interface on the server using the USB network device. For example:
ifconfig usb0 192.168.3.2 netmask 255.255.255.0 up
Then ping the simpleRTK3B network from the server via the USB device:
ping -c1 192.168.3.1
If there is a web browser available on the server, it can then access this URL to configure the simpleRTK3B.
If the server is headless, a tunnel can be created from workstation
to the server, then the USB web server is available on the workstation
via localhost. Create SSH tunnel, where server is the hostname
or IP of the server, run this on workstation:
ssh -N -L 127.0.0.1:8080:192.168.3.1:80 server
Then on the workstation, the simpleRTK3B Septentrio web configuration tool is available at:
If all is good on the device, it will have already found satellites.
It needs to be configured to dump data that galmon will read.
Septentrio simpleRTK3B Web Interface

-
Click mouse on "NMEA/SBF Out" option in the bar.
-
Click "New SBF stream".
-
Under "New SBF Output", select "IP server" and click "Next".
New SBF Output: IP server

-
Select "New IP server connection", click "Next".
-
Set a port, such as
29000and click "Next".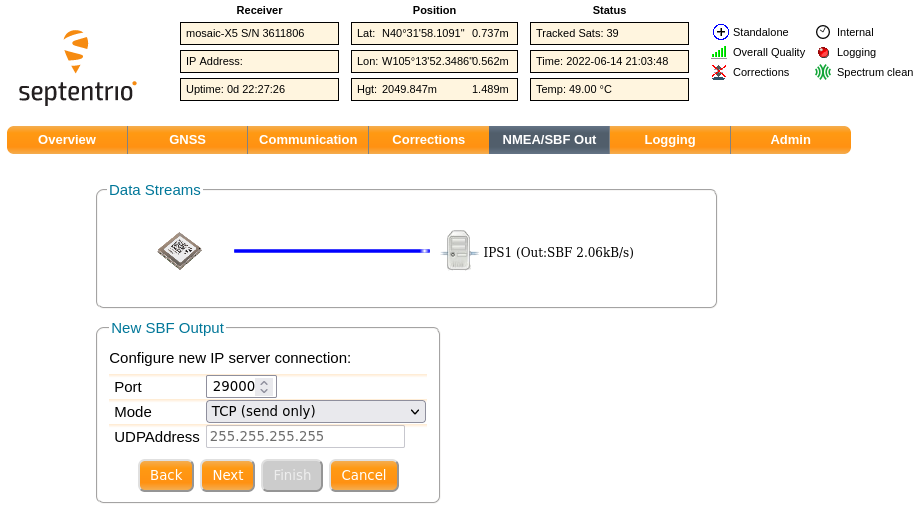
-
Under "Edit SBF Stream" select the following and click "Finish". Some items may need to be expanded:
MeasEpoch
GALRawFNAV
GALRawINAV
PVTCartesian
Some selections from simpleRTK3B "Edit Stream"

When the stream is configured, it should look like the below screenshot. There should be an option in the bottom right to save the configuration for reboot.
Septentrio simpleRTK3B configured with SBF output for galmon

Then create a script that runs septool to consume the web data
from the simpleRTK3B. Such as /usr/local/bin/galmon-sept:
#!/bin/bash

septool 								\
	--quiet true							\
	--source 192.168.3.1:29000					\
	--destination XXX.submit.galmon.eu				\
	--station XXX
Create a script to start it: /etc/systemd/system/galmon.service
[Unit]
Description=galmon septool
After=network-online.target
Wants=network-online.target

[Service]
ExecStart=/usr/local/bin/galmon-sept
User=debian
Group=debian
Restart=always

[Install]
WantedBy=multi-user.target
Then start it:
sudo systemctl start galmon.service
# Check logs:
tail -f /var/log/daemon.log
Start it at boot:
sudo systemctl enable galmon.service
Also, probably want to keep that USB network on reboot.
Add this to /etc/network/interfaces, for example:
auto usb0
iface usb0 inet static
        address 192.168.3.2/24
Then check if the ground station is appearing here:
Debian
Debian galmon builds with source and binaries for arm64 are in the
debian/ directory.
Status
Three ground stations running.
simpleRTK2B-mPCIe, puck antenna, low in canyon.
simpleRTK2B USB, Calibrated Survey GNSS Tripleband + L-band antenna, higher in canyon.
Septentrio. simpleRTK3B. Calibrated Survey GNSS Tripleband + L-band antenna, higher in canyon.
License / Copyright
Source:
Unofficial project, not part of official galmon software or website.
Upstream sources under their respective copyrights.
Copyright (C) 2022 Jeff Moe.
License: CC-By-SA 4.0 International or any later version.