13 KiB
wut?
wut --- What U Think? SatNOGS Observation AI.
Website:
satnogs-wut

The goal of satnogs-wut is to have a script that will take an observation ID and return an answer whether the observation is "good", "bad", or "failed".
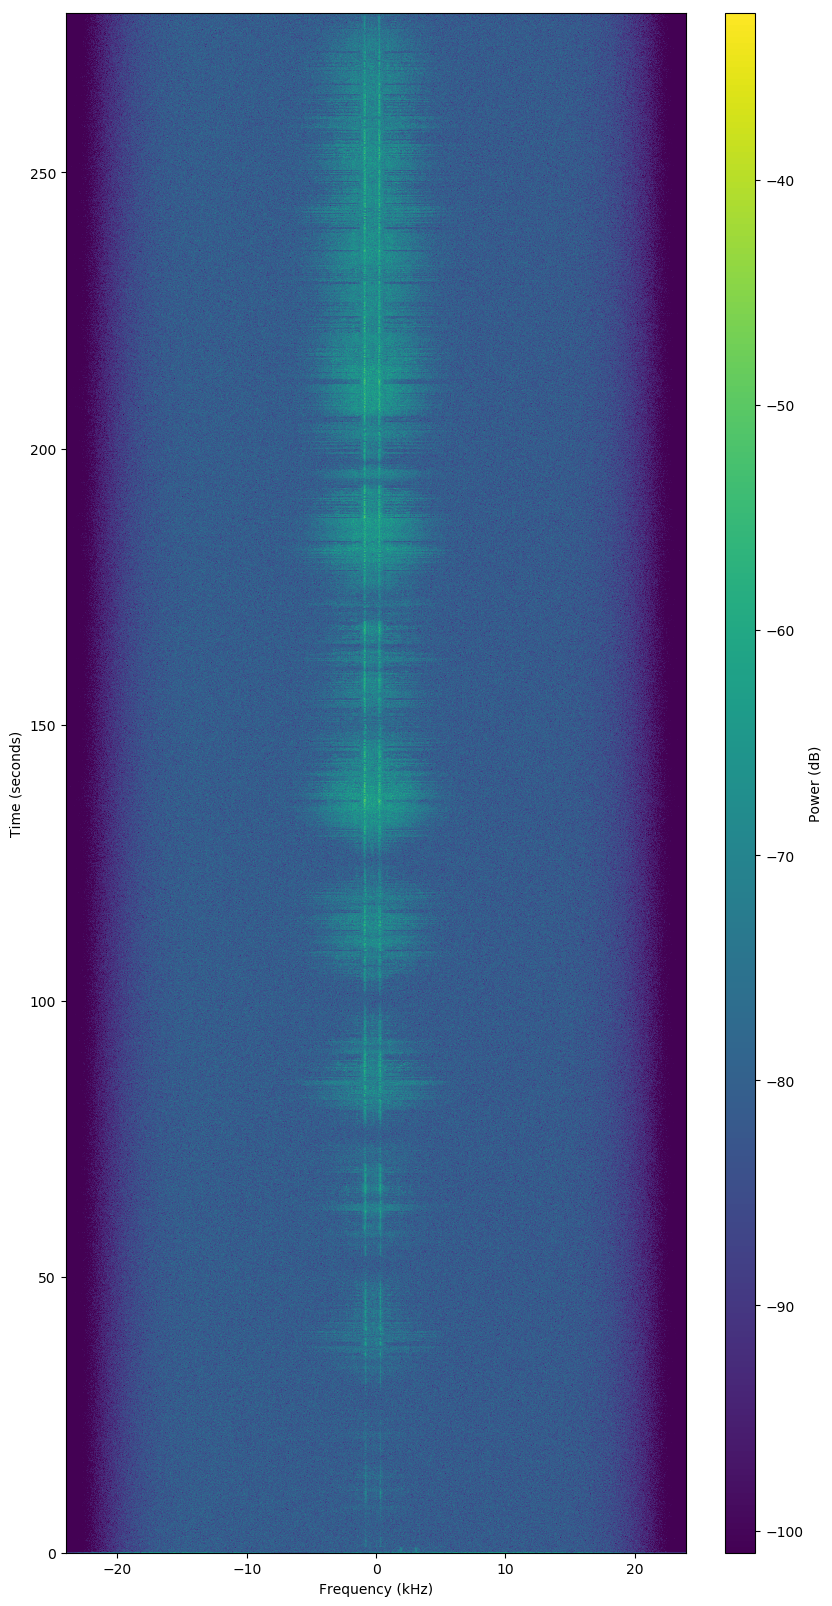
Good Observation
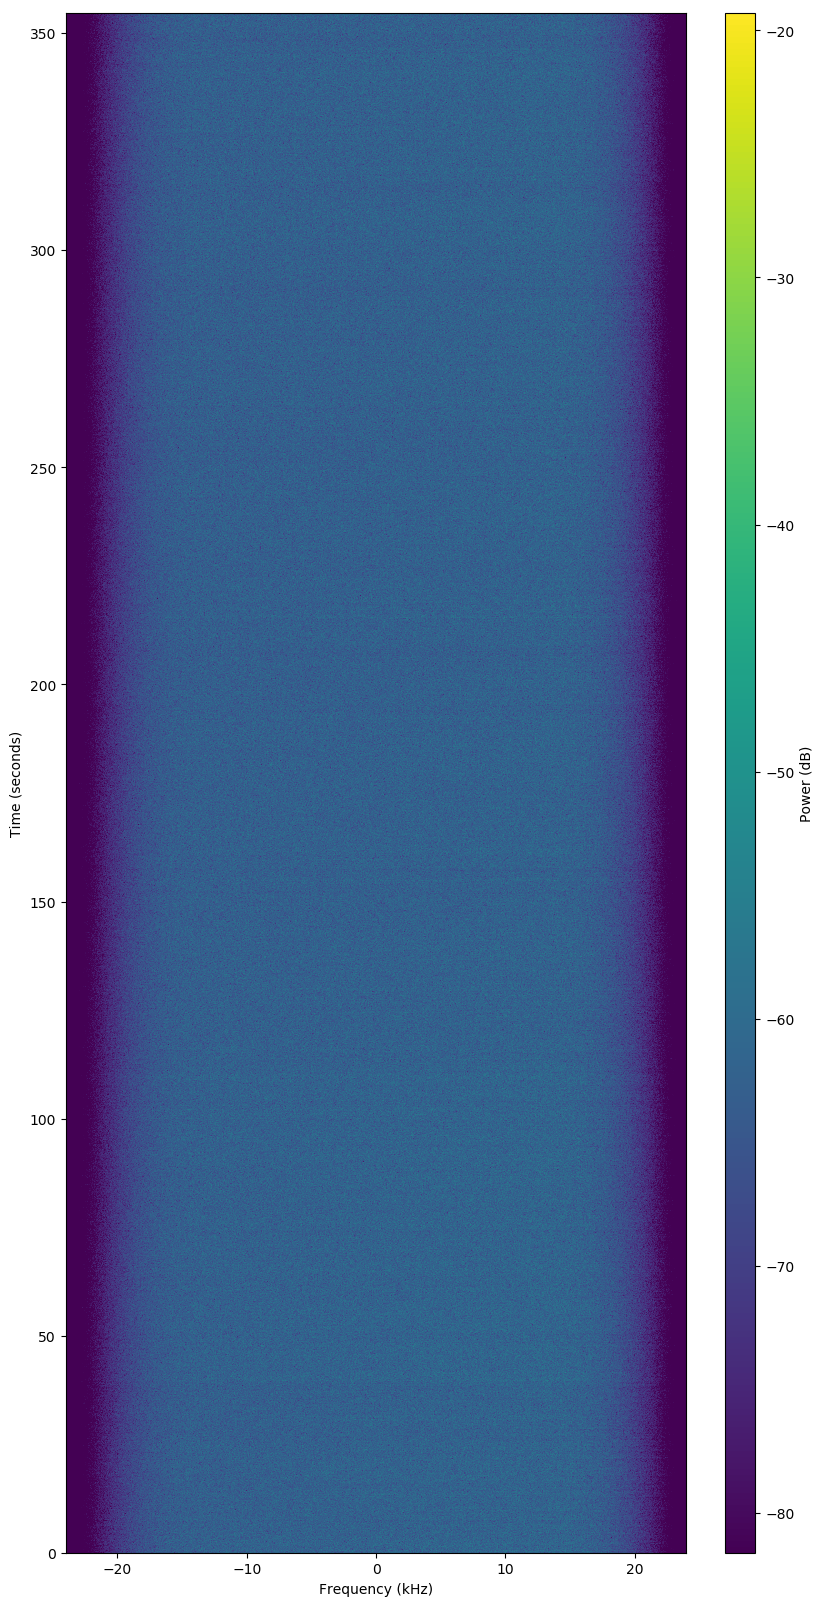
Bad Observation
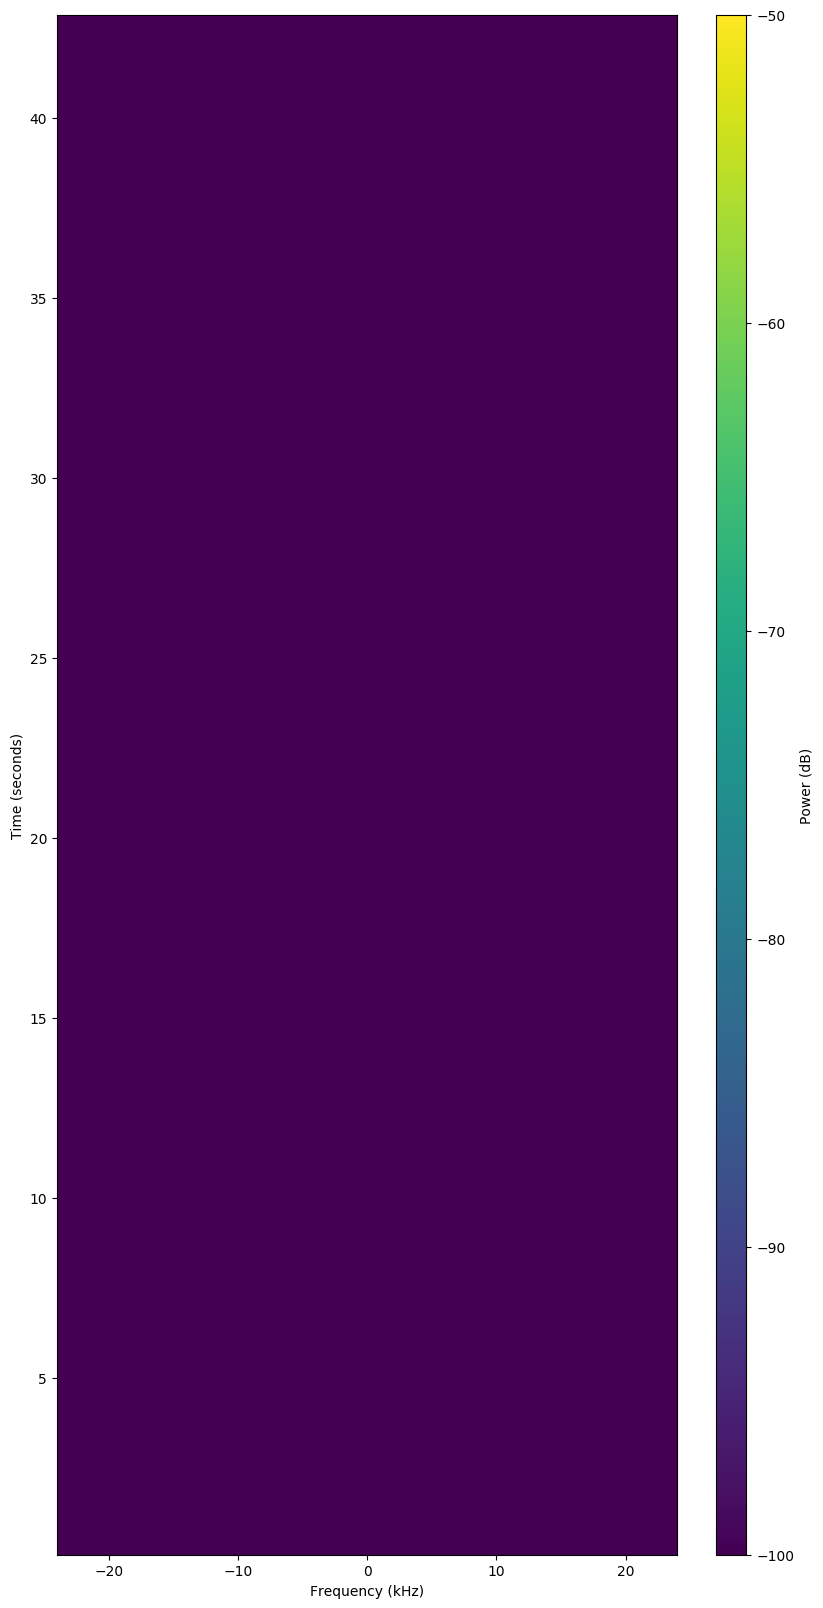
Failed Observation
wut Web
Main site:
Source code:
Beta (test) site:
Alpha (development) site:
Observations
See also:
- https://wiki.satnogs.org/Operation
- https://wiki.satnogs.org/Observe
- https://wiki.satnogs.org/Observations
- https://wiki.satnogs.org/Category:RF_Modes
- Sample observation: https://network.satnogs.org/observations/1456893/
Machine Learning
The system at present is built upon the following:
- Debian Buster.
- Tensorflow 2 with Keras.
- Jupyter Lab.
- Voila.
Learning/testing, results are good. The main AI/ML development is being done in Jupyter.
Jupyter
There Jupyter Lab Notebook files in the notebooks/ subdirectory.
These are producing usable results. Voila is used to convert
Jupyter notebooks into websites.
wut.ipynb--- Machine learning Python script using Tensorflow and Keras in a Jupyter Notebook.wut-predict.ipynb--- Make prediction (rating) of observation from pre-existing model.wut-train.ipynb--- Train models to be using by prediction engine.wut-web.ipynb--- Website: https://wut.spacecruft.org/wut-web-beta.ipynb--- Website: https://wut-beta.spacecruft.org/wut-web-alpha.ipynb--- Website: https://wut-alpha.spacecruft.org/
wut scripts
The following scripts are in the repo.
wut--- Feed it an observation ID and it returns if it is a "good", "bad", or "failed" observation.wut-audio-archive--- Downloads audio files from archive.org.wut-audio-sha1--- Verifies sha1 checksums of files downloaded from archive.org.wut-compare--- Compare an observations' current presumably human vetting with awutvetting.wut-compare-all--- Compare all the observations indownload/withwutvettings.wut-compare-tx--- Compare all the observations indownload/withwutvettings using selected transmitter UUID.wut-compare-txmode--- Compare all the observations indownload/withwutvettings using selected encoding.wut-compare-txmode-csv--- Compare all the observations indownload/withwutvettings using selected encoding, CSV output.wut-dl-sort--- Populatedata/dir with waterfalls fromdownload/.wut-dl-sort-tx--- Populatedata/dir with waterfalls fromdownload/using selected transmitter UUID.wut-dl-sort-txmode--- Populatedata/dir with waterfalls fromdownload/using selected encoding.wut-dl-sort-txmode-all--- Populatedata/dir with waterfalls fromdownload/using all encodings.wut-files--- Tells you about what files you have indownloads/anddata/.wut-files-data--- Tells you about what files you have indata/.wut-img-ck.py--- Validate image files are not corrupt with PIL.wut-ml--- Main machine learning Python script using Tensorflow and Keras.wut-ml-auto--- Machine learning Python script using Tensorflow and Keras, auto.wut-ml-load--- Machine learning Python script using Tensorflow and Keras, loaddata/wut.h5.wut-ml-save--- Machine learning Python script using Tensorflow and Keras, savedata/wut.h5.wut-obs--- Download the JSON for an observation ID.wut-ogg2wav--- Convert.oggfiles indownloads/to.wavfiles.wut-rm-random--- Randomly deletes stuff. Very bad.wut-review-staging--- Review all images indata/staging.wut-tf--- Shell script to set variables when launchingwut-tf.py.wut-tf.py--- Distributed learning script to be run on multiple nodes.wut-water--- Download waterfall for an observation ID todownload/[ID].wut-water-range--- Download waterfalls for a range of observation IDs todownload/[ID].wut-worker--- Shell script to set variables when launchingwut-worker.py.wut-worker.py--- Distributed training script to run on multiple nodes.wut-worker-mas--- Shell script to set variables when launchingwut-worker-mas.py.wut-worker-mas.py--- Distributed training script to run on multiple nodes, alt version.
Installation
Installation notes...
There's more docs on a few different setups in the docs/ subdir.
Setup
The scripts use files that are ignored in the git repo. So you need to create those directories:
mkdir -p download
mkdir -p data/train/good
mkdir -p data/train/bad
mkdir -p data/train/failed
mkdir -p data/val/good
mkdir -p data/val/bad
mkdir -p data/val/failed
mkdir -p data/staging
mkdir -p data/test/unvetted
Debian Packages
You'll need curl and jq, both in Debian's repos.
apt update
apt install curl jq
Install Tensorflow
For the machine learning scripts, like wut-ml, Tensorflow
needs to be installed.
As of version 2 of Tensorflow, Keras no longer needs to be
installed separately.
The verions of Tensorflow installed with pip3 on Debian
Buster crashes. It is perhaps best to do a custom install,
best preferred build options, of the most preferred version.
At this point, the remotes/origin/r2.1 branch is preferred.
To install Tensorflow:
-
Install dependencies in Debian.
-
Install Bazel to build Tensorflow.
-
Build Tensorflow pip package.
-
Install Tensorflow from custom pip package.
# Install deps
apt update
apt install python3-pip
# Install bazel .deb from releases here:
firefox https://github.com/bazelbuild/bazel/releases
# Install Tensorflow
git clone tensorflow...
cd tensorflow
git checkout v2.1.0
bazel clean
# Get flags to pass:
grep flags -m1 /proc/cpuinfo | cut -d ":" -f 2 | tr '[:upper:]' '[:lower:]' | { read FLAGS; OPT="-march=native"; for flag in $FLAGS; do case "$flag" in "sse4_1" | "sse4_2" | "ssse3" | "fma" | "cx16" | "popcnt" | "avx" | "avx2") OPT+=" -m$flag";; esac; done; MODOPT=${OPT//_/\.}; echo "$MODOPT"; }
./configure
# Run Bazel to build pip package. Takes nearly 2 hours to build.
bazel build --config=opt //tensorflow/tools/pip_package:build_pip_package
./bazel-bin/tensorflow/tools/pip_package/build_pip_package /tmp/tensorflow_pkg
pip3 install --user /tmp/tensorflow_pkg/tensorflow-2.1.0-cp37-cp37m-linux_x86_64.whl
Tensorflow KVM Notes
Recent versions of Tensorflow can handle many more CPU build options to optimize for speed, such as AVX. By default, Proxmox and likely other virtual machine systems pass kvm/qemu "type=kvm" for CPU type. To use all possible CPU options available on the bare metal server, use "type=host". For more info about this in Proxmox, see CPU Type If you don't have this enabled, CPU instructions will fail or Tensorflow will run slower than it could.
Tensor Configuration
$ ./configure
WARNING: --batch mode is deprecated. Please instead explicitly shut down your Bazel server using the command "bazel shutdown".
You have bazel 0.29.1 installed.
Please specify the location of python. [Default is /usr/bin/python3]:


Found possible Python library paths:
  /usr/lib/python3/dist-packages
  /usr/local/lib/python3.7/dist-packages
Please input the desired Python library path to use.  Default is [/usr/lib/python3/dist-packages]

Do you wish to build TensorFlow with XLA JIT support? [Y/n]:
XLA JIT support will be enabled for TensorFlow.

Do you wish to build TensorFlow with OpenCL SYCL support? [y/N]:
No OpenCL SYCL support will be enabled for TensorFlow.

Do you wish to build TensorFlow with ROCm support? [y/N]:
No ROCm support will be enabled for TensorFlow.

Do you wish to build TensorFlow with CUDA support? [y/N]:
No CUDA support will be enabled for TensorFlow.

Do you wish to download a fresh release of clang? (Experimental) [y/N]:
Clang will not be downloaded.

Please specify optimization flags to use during compilation when bazel option "--config=opt" is specified [Default is -march=native -Wno-sign-compare]: -march=native -mssse3 -mcx16 -msse4.1 -msse4.2 -mpopcnt -mavx


Would you like to interactively configure ./WORKSPACE for Android builds? [y/N]:
Not configuring the WORKSPACE for Android builds.

Preconfigured Bazel build configs. You can use any of the below by adding "--config=<>" to your build command. See .bazelrc for more details.
	--config=mkl         	# Build with MKL support.
	--config=monolithic  	# Config for mostly static monolithic build.
	--config=ngraph      	# Build with Intel nGraph support.
	--config=numa        	# Build with NUMA support.
	--config=dynamic_kernels	# (Experimental) Build kernels into separate shared objects.
	--config=v2          	# Build TensorFlow 2.x instead of 1.x.
Preconfigured Bazel build configs to DISABLE default on features:
	--config=noaws       	# Disable AWS S3 filesystem support.
	--config=nogcp       	# Disable GCP support.
	--config=nohdfs      	# Disable HDFS support.
	--config=nonccl      	# Disable NVIDIA NCCL support.
Configuration finished
KVM
Note, for KVM, pass cpu=host if host has "avx" in /proc/cpuinfo.
Install Jupyter
Jupyter is a cute little web interface that makes Python programming easy. It works well for machine learning because you can step through just parts of the code, changing variables and immediately seeing output in the web browser.
Probably installed like this:
pip3 install --user jupyterlab
# Also other good packages, maybe like:
pip3 install --user jupyter-tensorboard
pip3 list | grep jupyter
# returns:
jupyter              1.0.0
jupyter-client       5.3.4
jupyter-console      6.0.0
jupyter-core         4.6.1
jupyter-tensorboard  0.1.10
jupyterlab           1.2.4
jupyterlab-server    1.0.6
Usage
The main purpose of the script is to evaluate an observation, but to do that, it needs to build a corpus of observations to learn from. So many of the scripts in this repo are just for downloading and managing observations.
The following steps need to be performed:
-
Download waterfalls and JSON descriptions with
wut-water-range. These get put in thedownloads/[ID]/directories. -
Organize downloaded waterfalls into categories (e.g. "good", "bad", "failed"). Use
wut-dl-sortscript. The script will sort them into their respective directories under:data/train/good/data/train/bad/data/train/failed/data/val/good/data/val/bad/data/val/failed/
-
Use machine learning script
wut-mlto build a model based on the files in thedata/trainanddata/valdirectories. -
Rate an observation using the
wutscript.
ml.spacecruft.org
This server is processing the data and has directories available to sync.
Data Caching Downloads
The scripts are designed to not download a waterfall or make a JSON request
for an observation it has already requested. The first time an observation
is requested, it is downloaded from the SatNOGS network to the download/
directory. That download/ directory is the download cache.
The data/ directory is just temporary files, mostly linked from the
downloads/ directory. Files in the data/ directory are deleted by many
scripts, so don't put anything you want to keep in there.
Preprocessed Files
Files in the preprocess/ directory have been preprocessed to be used
further in the pipeline. This contains .wav files that have been
decoded from .ogg files.
SatNOGS Observation Data Mirror
The downloaded waterfalls are available below via http and rsync.
Use this instead of downloading from SatNOGS to save their bandwidth.
# Something like:
wget --mirror https://ml.spacecruft.org/download
# Or with rsync:
mkdir download
rsync -ultav rsync://ml.spacecruft.org/download/ download/
Caveats
This is the first artificial intelligence script I've done, I know little about radio and less about satellites, and I'm not a programmer.
Source License / Copying
Main repository is available here:
License: CC By SA 4.0 International and/or GPLv3+ at your discretion. Other code licensed under their own respective licenses.
Copyright (C) 2019, 2020, Jeff Moe